Noted is a fully-integrated audio recording and note-taking app.
What does that mean though?


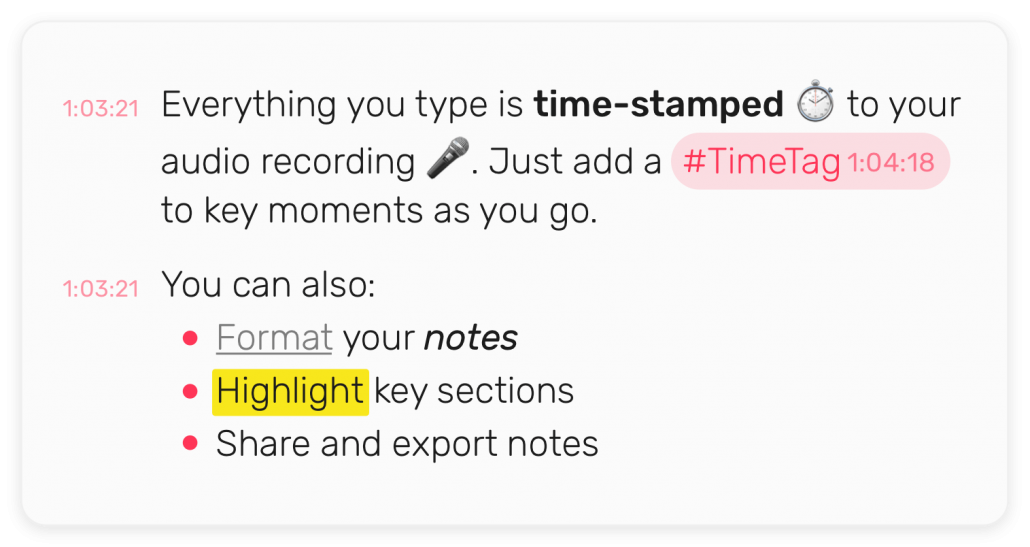
Noted allows you to type out notes as well as recording audio clips to link with your notes meaning it’s easier to keep everything neat, tidy and together. If, for example, you record a whole lecture or class talk, everything you type is time-stamped so you know what point of the audio clip was happening as you typed. You can also add a little #TimeTag on specific points so you can easily jump back and forth between key pieces of information you want to make sure you don’t forget. Then you can also link specific pieces of text to those #TimeTags to join written notes and audio notes together more.

It means you’re boosting your productivity by having all your notes in one place and with audio notes you get to keep the context of what you’re trying to note. You don’t have to miss anything anymore.

All this is completely free! 

Noted only works with Apple products, but it does that seamlessly across Mac, iPhone, iPad and Apple Watch so you can just record a quick note on your Watch and it will automatically be synced to your Mac for when you need it. The same with your phone, if you’re out and about just open your phone and record a quick message or type a quick note and you’ll be able to get it on your Mac almost instantly.

There is also a Noted+ extra subscription if you like it enough. This extra includes dictation so you can turn your spoken words into written notes, it includes improved quality, background noise reduction and better exporting tools among other things. The best feature of Noted+ is that it includes Intelligent Playback so with that turned on, when it’s playing your notes back to you it will automatically skip and silence or background noise and only play you the important bits. Noted+ is $24 a year, roughly £17, at the time of writing.

WeVideo – Make videos on any device, anywhere.


WeVideo is a cloud-based video editor that enables you create pro like videos on any device, including Chromebook, Windows, Mac, and Mobile. Cloud-based storage means there is no software to download and install, with the added flexibility of accessing your projects on any device. Get advanced with features like green screen to take your videos to the next level. Once you’ve finished your video, export in multiple formats and save directly to your Google Drive.


Sign-up

Sign-up and sign-in to WeVideo using your college Google account. This will make it easy to sign-in across all your devices and save your projects on Google Drive.

Let’s get started

To get started, select the type of project you’d like to create:

  • Video – Start a new video project;
  • Recording – Record your screen and webcam;
  • GIF – Create an animated GIF to embed in a presentation, website, or share on social media.


Import media

You can upload video and images directly from your device or add media stored on your Google Drive. After adding your media, simply drag it onto the timeline. WeVideo also includes a huge library of stock media footage.


Add transitions

To add a new transitions, click on the Transitions tab and drag the transition onto the timeline. Preview each transition by hovering your mouse over it and clicking Play.


Add audio

Add music and sound effects to your video. Browse the audio available in WeVideo or upload your own.


Add animated text

Use text for a title screen, credits, or label elements in your video project. Go to the text tab and then drag the text element onto the timeline. Afterwards, double click the text on the timeline to edit it.


Export and share your video

Exporting your video to share with the world is quick and easy. Press the finish button, name your project, select the appropriate resolution and press export. You can even ask WeVideo to save the export straight to your Google Drive.


WeVideo Academy

To learn more about WeVideo and discover how to creatively use video creation projects in the classroom go and explore the training available at the WeVideo Acadmey.

Flat IO – Write your music scores online with the easiest tool for creating sheet music together.


User friendly online music notation software that gives you all the tools that you need to make your own sheet music. You can write, listen, share and discover music scores right in your web browser on any device.

Invite your friends to compose your music scores online collaboratively. A single musical composition can be opened and edited in real time by multiple people using different devices at the same time.

  • Your music notation editor online in your web browser
  • Real-time collaboration and offline edition if you lose your internet connection
  • Compose with your MIDI devices: plug your device and play!
  • MusicXML, MIDI, PDF and Audio (MP3 and WAV) compatibility
  • Read and write music notation and guitar tablatures, together
  • Smart History: Browse all the modifications you made, note after note
  • Collaborate with video within Google Hangouts
  • Percussion instruments and notation to create amazing drum scores
  • Online digital and visual metronome to help you to practice easily

For teachers there is an Education version available. Flat for Education is designed for your music classroom. You can use it on any device to access and create your musical compositions or music education activities. Flat has a unique collaborative experience: let your students work in real-time on the same sheet music, whether you are in the classroom or working from home. It can also integrate with Google Classroom to make it easier with your classes.

Examples

You can see all the most popular creations on Flat.IO on their ‘Popular‘ page. We’ve added a few examples below:

Lil Nas X – Old Town Road made on Flat.IO using a Classical Guitar, Horn in C, Clarinet, Grand Piano and a Tuba.

The Ghostbusters Theme Song with a Grand Piano and a Drumset.

The Shaun the Sheep Theme Song made on Flat.IO using 2 Banjo’s and a Tin Whistle.

Camila Cabello – Havana made on Flat.IO using just a Grand Piano.

Soundtrap let’s you record instruments, vocals and use loops to make music anywhere.


Soundtrap for Education is a cloud-based platform that enables students to create music or podcasts. With Soundtrap, students can collaborate on projects using an extensive collection of quality loops, effects, and software instruments from anywhere in the world pretty much on any device. It also integrates with Google Classroom for effortless collaboration.

It’s worth noting that Students can’t sign up for this without a teacher already signing up beforehand. There is a free trial available for teachers and after that there is reduced pricing available for education.

For example, start a new song using all the built in professional loops and software instruments on your tablet when on the bus, continue on your Chromebook when arriving at home, invite a couple of friends, who are working on Mac and Windows devices, and conduct a video chat from within the studio coming up with the bass line for the song and finally find a didgeridoo player in the Soundtrap community laying down a unique ending of the song; you are all working in the same project seeing and hearing all the changes. It’s like Google Docs, but for music production!

Steps for Getting Started with Soundtrap

Step 1:  Create a free school trial account at www.soundtrap.com/edu 

  • Select ‘Start as a Teacher’ to set up your trial account
  • All new trial accounts will get free access to Soundtrap for Education until the end of the term/semester (during the COVID-19 closures)
  • All trial accounts will be given 500 seats by default

Step 2: Invite others or roster students with one of the following methods:

  • Google Classroom integration, click here for instructions
  • Invite by group code, click here for instructions

Congratulations! You have registered your users on Soundtrap!

Step 3: Start incorporating Soundtrap into your classes! 

Step 4: The following are essential skills to review:

Step 5: Support and Community

Adobe Capture is a fantastic app that enables you to find fonts and colours or create a vector simply by taking a photo.


Use your mobile device as a vector converter to turn photos into colour themes, patterns, type, materials, brushes and shapes. Then bring those assets into your favourite desktop and mobile apps — including Adobe Photoshop, Illustrator, Dimension, XD and Photoshop Sketch — to use in all your creative projects. FAD have a quick run through on Capture that you can see here.

Identify Typography

Find your perfect font using Adobe Capture. Take a photo of the type you like (in a magazine, on a label, a sign, anywhere!) and watch a list of similar Adobe Fonts magically appear.

Vectorize on the Go

Create vectors instantly with Shapes. Turn images into smooth, scalable vectors with 1-32 colors, for use in logos, illustration, animation, and more. Point and shoot at your drawing or upload a photo and watch it transform into clean, crisp lines.

Create Color Themes/Gradients

Designers, rejoice! Looking for customized color palettes? Find an inspiring gradient? Aim your camera at the scene that has the colors you want and capture them to use in your artwork.

Craft Intricate Patterns

Capture inspiring images and generate patterns with Capture preset geometrics. Easily create beautiful, colorful patterns that fit with your creative projects by using your vector shapes with our precision pattern builder.

Build Beautiful Digital Brushes

Can’t find the right brush? Take a photo or use an image to create digital brushes that match your creative vision. Use your brushes in Photoshop or Illustrator for rich painterly effects.

Generate 3D Textures

Generate realistic PBR materials for use in 3D design straight from the camera. Modify your materials for even more texture or blend the edges for seamless repeat tiling on your 3D objects.

Capture Light and Color

Collect light and hue to turn into beautiful color grading profiles for your images and videos with Looks. Record the magic of a sunset and transfer that feel to use in your photos and video projects.

Seamlessly Sync Creative Elements

All your assets save to Adobe Creative Cloud libraries. Instantly access your digital elements from your Creative Cloud account in all compatible applications.

ADOBE CAPTURE: HOW TO

WORKFLOW, TIPS & TRICKS

Adobe Scan is a mobile document scanner that can turn anything into an Adobe PDF.


With Adobe Scan, easily capture and convert documents, forms, business cards, and whiteboards into high-quality Adobe PDFs. And with different capture modes, you can ensure that you capture the clearest scan every time.

Fast and easy signatures and form filling.

Eliminate the hassle of finding a printer, filling a form by hand, and scanning it again. Use Adobe Scan to turn paper forms into interactive digital documents you can easily fill out, sign and share.

Intelligently cleaner and clearer scans.

Using Adobe Sensei, Adobes powerful AI, Adobe Scan identifies and sharpens handwritten or printed text, while removing elements you don’t want, like glare and shadow.

Share scans from anywhere.

Scans are stored in Adobe Document Cloud so they’re easy to access, share, or upload directly into emails.


Using Adobe Scan and Google Classroom

The video below will quide you through installing the app and uploading your first scan to Google Drive, which you’ll then be able to upload to Google Classroom.

We’ll take you through the steps below too:

  1. Open the Adobe Scan app.
  2. Press the Camera icon.
  3. Place what you want to scan in view of your device camera.
  4. Wait while the app detects the page and content, when it’s done that it will automatically take an image of it.
  5. When the image has been taken, you can drag the borders around the page to more accurately outline a page.
  6. Once happy with the image, press Continue.
  7. Repeat steps 3-6 until you have scanned everything that you need to.
  8. Press the small image of your last scan in the bottom right corner.
  9. Scroll through the pages and make any visual adjustments you wish.
    1. You can crop out unwanted bits, reorder the pages or change the coloring to make it easier to read. You can also use the Cleanup feature to remove unwanted blemishes in the image.
  10. Once happy, press Save PDF.
  11. The app will now prepare the final PDF for you.

Now to upload this to Google Drive.

  1. On the screen with your PDF, press Share.
  2. Press Share a Copy.
  3. Locate and press Save to Drive or Google Drive.
  4. Enter a name for the file, select which account to save it to and where to save it then press Save.

Now to add to Google Classroom.

  1. Open the class you want to upload this to in Classroom.
  2. Locate and open your assignment.
  3. Click on Add or create.
  4. Select Google Drive.
  5. Locate and select your new PDF.
    1. If you have just uploaded it, you should find it easily in the Recent tab.
  6. Click Add.
  7. Now, if that’s all you need to do for that assignment you can hand it in.

BBC iPlayer lets you watch BBC content from your computer, Smart TV or mobile device.


BBC iPlayer isn’t just for catching up on last night’s Eastenders or rewatching Gavin & Stacey for the 17th time, you can also find a lot of educational material in its depths. You can watch the latest episodes of QI to learn more quirky facts about the world or explore the hundreds of episodes of Science and Nature documentaries. There’s also great comedy and entertainment shows for when you have finished your work for the day and need to relax.

David Attenborough alone can take you through Climate Change for your Science lesson research, the different ecosystems around the world for your Geography research or even the early years of making nature documentaries for Media lesson research.

Some more examples of programmes that can aid your research are below:

Criminology – Jack the Ripper

Engineering – The Limit: Trickiest Tunnel

Music – Miles Davis: Birth of the Cool

Sport – Shane Williams: Rugby, Concussion and Me

Dance – The Royal Ballet: Mayerling

Don’t forget though that some episodes are only available for a limited time and can be removed from iPlayer at any time.

You can look through all the episodes and series available for each subject on the BBC iPlayer website or click one of these categories; History, Documentaries, Science & Nature, Music.

With Canva, you can easily create beautiful documents & designs for any occasion and purpose. From social media posts to presentations, you can browse more than 65,000 editable templates or you can start from scratch if you’re feeling adventurous.

Canva also makes it easy for you to access millions of stock images, illustrations, icons and fonts inside the app. Our media library content is available for use in all your designs.

You can also:

  • Store, organize and edit your images in a breeze
  • Customize your templates and share them with your team to edit
  • Publish your designs anywhere to reach your audience

Did you know, as a Teacher you can get Canva Pro for free and can unlock it for up to 30 students in your class! All you have to do is sign up at Canva then fill in the form at this link.

Some of the pre-made templates you can use include:

  • Posters
  • Logos
  • Magazine Covers
  • Certificates
  • Book Covers
  • Calendars
  • Invitations
  • Infographics
  • Tickets
  • Desktop Wallpapers
  • Menus
  • Recipe Card

You can take a more in-depth look at all the available templates here.

All the images below were created using some of the ready-made templates that Canva has. You can add animated GIFs to your posts too.

ThingLink allows you to seamlessly make any photo, video or 360 content into an interactive experience with text, links, sound, images, videos and calls to action.

You can narrate a 360 tour, make an infographic, create an interactive treasure map or just document your holiday. There are so many possibilities with ThingLink.

Want to learn more about ThingLink? Take a look at their slide-deck.

The example below I made quickly in 5 minutes, hover your mouse and click on the little information tags on the image. Scroll down to the bottom to see a 360 example from Nagh-Jahan Square in Iran,

With Google Sites, you can quickly create a website to gather a variety of information in one place – including videos, calendars, presentations, attachments, and text – and easily share it for viewing with your class, course or the entire college.

Creating a web page using Google Sites is as simple as writing a document, and you can easily embed Google Docs, Slides and YouTube videos to develop interactive websites.

You can access the new Google Sites by logging into Google Sites and then select “Create”.

Read more