Hangouts Meet is Google’s video conferencing tool that also allows you to share your screen with attendees.

Hangouts Meet is Google’s video conferencing tool that enables you to to talk face to face and share your screen with others. Lesson content can be shared in a live video stream with groups ranging from a few people up to hundreds of users. You can use it on the web at meet.google.com, on your Android device and on iOS devices. You can either just jump straight into a Video Meeting or schedule one for a later date and time in Google Calendar.

One of the best features of Hangouts Meet is it’s ability to provide live captions/subtitles which can be turned on by anyone who needs it.

We’ve written up a quick run through of Hangouts Meet and how to get started below.

STUDENTS ARE ASKED TO FOLLOW THIS VIDEO CONFERENCING ETIQUETTE GUIDE TO ENSURE YOU CAN TEACH WITHOUT INTERUPTION.


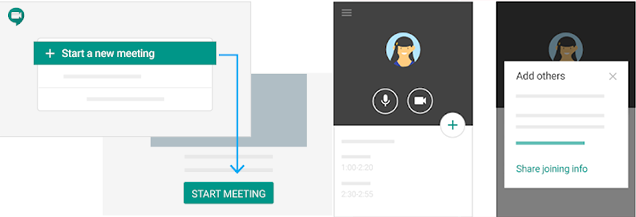
Starting a video meeting

You can start a new session by opening Hangouts Meet in the web or in the app and clicking Start a new meeting or pressing the Plus + icon.

In both methods, once you’ve set up the meeting, you’ll then be offered the chance to invite people to join you.

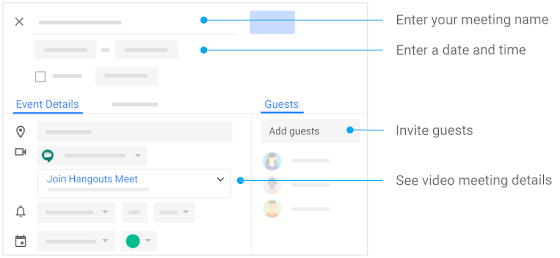
Scheduling a video meeting

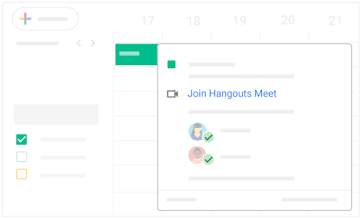
To schedule a meeting for the future, simply head to Calendar and create an event then click on Add Conferencing and it will automatically create a Hangouts Meet session ready for the set date and time.

You can then invite guests to the event and they’ll all receive the information to join the video call.


Joining a video meeting

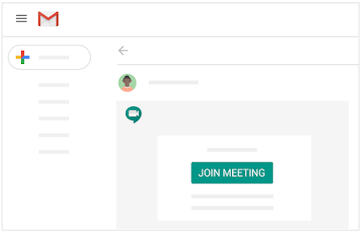
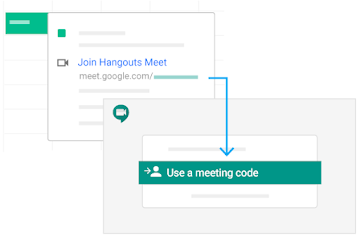
Joining a video meeting can be done in a number of different ways depending on how it’s been set up. You can click the link in your calendar appointment, or your meeting text or email. You can type in the meeting code on the Hangouts Web website or even dial in to the meeting on a physical phone.

Calendar Appointment
Email Link
Meeting Code
Phone Dial In

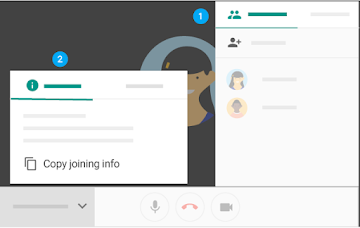
Adding people to a meeting

If you need to add more people to a meeting after the initial setup that is easy to do using one of two methods.

Option 1 – Click the People tab in the top right then Add People and enter their email addresses.

Option 2 – Click the meeting name in the bottom left corner of the screen and copy the joining info so you can then paste that in to your own email to whoever you want.

You can find more information here including how to remove people.

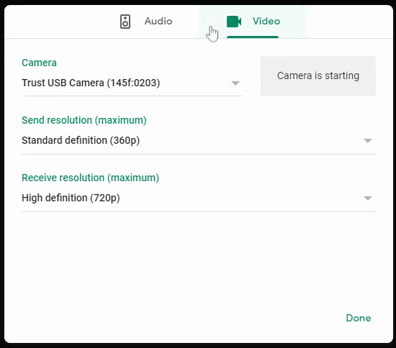
Change your computer’s Video & Audio settings

Meet will pick up your default camera, speaker and microphone which in most cases will be the only ones you have however if you plug in alternative devices to use instead, it should then automatically pick these up instead of any built-in device.

More information can be found here and steps for changing the settings within the mobile apps can be found here.
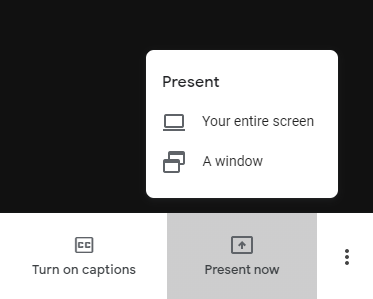

Sharing your screen

Sharing or ‘Presenting’ your screen is possible on computers and iOS devices but not currently supported on Android devices. On the computer you can opt to share your whole screen or just an individual window whereas on the iOS device you can only share your whole screen.

To present on your computer just look for the Present now button in the bottom right of the meeting window then select if you want to share your entire screen or a window. Sharing just a window will allow you to share just a presentation or document whilst allowing you to continue working on your computer.

More information including how to take over presenting from someone else can be found here.

With Canva, you can easily create beautiful documents & designs for any occasion and purpose. From social media posts to presentations, you can browse more than 65,000 editable templates or you can start from scratch if you’re feeling adventurous.

Canva also makes it easy for you to access millions of stock images, illustrations, icons and fonts inside the app. Our media library content is available for use in all your designs.

You can also:

  • Store, organize and edit your images in a breeze
  • Customize your templates and share them with your team to edit
  • Publish your designs anywhere to reach your audience

Did you know, as a Teacher you can get Canva Pro for free and can unlock it for up to 30 students in your class! All you have to do is sign up at Canva then fill in the form at this link.

Some of the pre-made templates you can use include:

  • Posters
  • Logos
  • Magazine Covers
  • Certificates
  • Book Covers
  • Calendars
  • Invitations
  • Infographics
  • Tickets
  • Desktop Wallpapers
  • Menus
  • Recipe Card

You can take a more in-depth look at all the available templates here.

All the images below were created using some of the ready-made templates that Canva has. You can add animated GIFs to your posts too.

ThingLink allows you to seamlessly make any photo, video or 360 content into an interactive experience with text, links, sound, images, videos and calls to action.

You can narrate a 360 tour, make an infographic, create an interactive treasure map or just document your holiday. There are so many possibilities with ThingLink.

Want to learn more about ThingLink? Take a look at their slide-deck.

The example below I made quickly in 5 minutes, hover your mouse and click on the little information tags on the image. Scroll down to the bottom to see a 360 example from Nagh-Jahan Square in Iran,

Spiral is a quick way to carry out formative assessments in the classroom or during distance learning.


Engage students in lessons and at home with simple to use everyday learning activities.

Spiral Lite is the free version of Spiral, within this you get access to Google Classroom integration, the Spiral Dashboard and many more features including Quickfire Lite, a tool that allows you to ask a verbal question in the class or on a Meet and the student can respond from any device.


Launch an activity or post an assignment to be completed asynchronously

Students connect with the activity using a simple code on any device

Students answers appear live so they can learn from each other

Or you can review, grade and feedback assignments off-line

Free Features

  • In Class
    • Run live activities with students, review and grade them
  • Quickfire Lite
    • Live assessments
  • Dashboard
    • Build activities and assignments
  • Feedback and Grading
    • Realtime feedback
    • Build evidence of student learning
  • Timeline and Exit Tickets
    • Record of each class session
    • Record of each student’s learning
    • Share results with parents
  • Google Classroom Integration
    • Import class list
  • Student Dashboard
    • Students can see all assigned work
    • Can see grades

Quickfire Lite

Take a look at the video below to see about how you can use Quickfire Lite for classroom based or virtual teaching.

Save, organise and share content across the web with Wakelet.

This is a great tool that allows you to pool all of you research in to one location, called a Wake. You can save webpages, images, videos, tweets, articles, blog posts and more just by pasting the link in to Wakelet or by installing it’s browser extension and just clicking two buttons. Then you can share your wake with anyone in the world, or keep it private to you.

Take a look at some examples of Wakes below, these show you different formatting options and custom layouts.

The TED-Ed project — TED’s education initiative — makes short video lessons worth sharing, aimed at educators and students. Within TED-Ed’s growing library of lessons, you will find carefully curated educational videos, many of which are collaborations between educators and animators nominated through the TED-Ed platform.

Our very own Director of Humanities, Mark Robinson, has collaborated with TED-Ed to make range of videos:

Google Classroom is an online learning platform for schools and colleges that aims to simplify creating, distributing and marking assignments in a paperless way. Google Classroom is designed to help students and teachers communicate, collaborate, organise and manage assignments, go paperless, and much more! Classroom also seamlessly integrates with other Google tools like Google Docs and Drive.

Improved Communication – Teachers can create assignments, send announcements, and instantly start class discussions. Students can share resources with each other and interact in the class stream or by email. Teachers can also quickly see who has or hasn’t completed the work, and give direct, real-time feedback and grades.

Better Organisation – Students can see assignments on the To-do page, in the class stream, or on the class calendar. All class materials are automatically filed into Google Drive folders.

Read more

The EdTech Podcast mission is to improve the dialogue between ‘ed’ and ‘tech’ through storytelling, for better innovation and impact. This podcast covers a range of topics including AI, game-based learning, future tech and trends.

To listen to The EdTech Podcast on Apple Podcasts, Google Podcasts, or Spotify, visit https://theedtechpodcast.com/edtechpodcast/

In the Google Teacher Tribe Podcast, Matt Miller (ditchthattextbook.com) and Kasey Bell (shakeuplearning.com) share the latest Google for Education news and updates, with tips and strategies for embeding Google’s tools in the classroom.

To listen to the Google Teacher Tribe Podcast on Apple Podcasts, Google Podcasts, or Spotify, visit https://googleteachertribe.com/

The Suite Talk podcast mission is to give educators around the world best practices and guidance for implementing educational technology in the classroom. This podcast focuses on giving ideas of how to use the features of Google for Education to provide the best digital learning environment for students.

To listen to the The Suite Talk podcast on Apple Podcasts, Google Podcasts, or Spotify, visit https://sites.google.com/view/thesuitetalk/home