Blogger
Blogger is Google’s free blogging service, probably the most famous blog service in the world. Whether you’d like to share your knowledge, experiences or the latest news, create a unique and beautiful blog for free.
It’s so simple to get started with Blogger, follow the steps below to start your first blog. Before you do get started though, it’s worth noting that Blogger will only work in Chrome, Firefox, Opera or Safari browsers so if you’re using Internet Explorer or Microsoft Edge, you’ll need to get yourself one of the other browsers listed here. Also, your blog can either be Public for anyone in the world to see or Private where you can limit it to a maximum of 100 people to view it. If you want more than 100 people to be able to view it but don’t want it to be public to the world, it might be best creating a Google Site and adapting it into a blog instead.
If you are creating a blog for a personal reason, it might be best to create it using a personal Google account as you may lose access to your blog when you leave Barton.
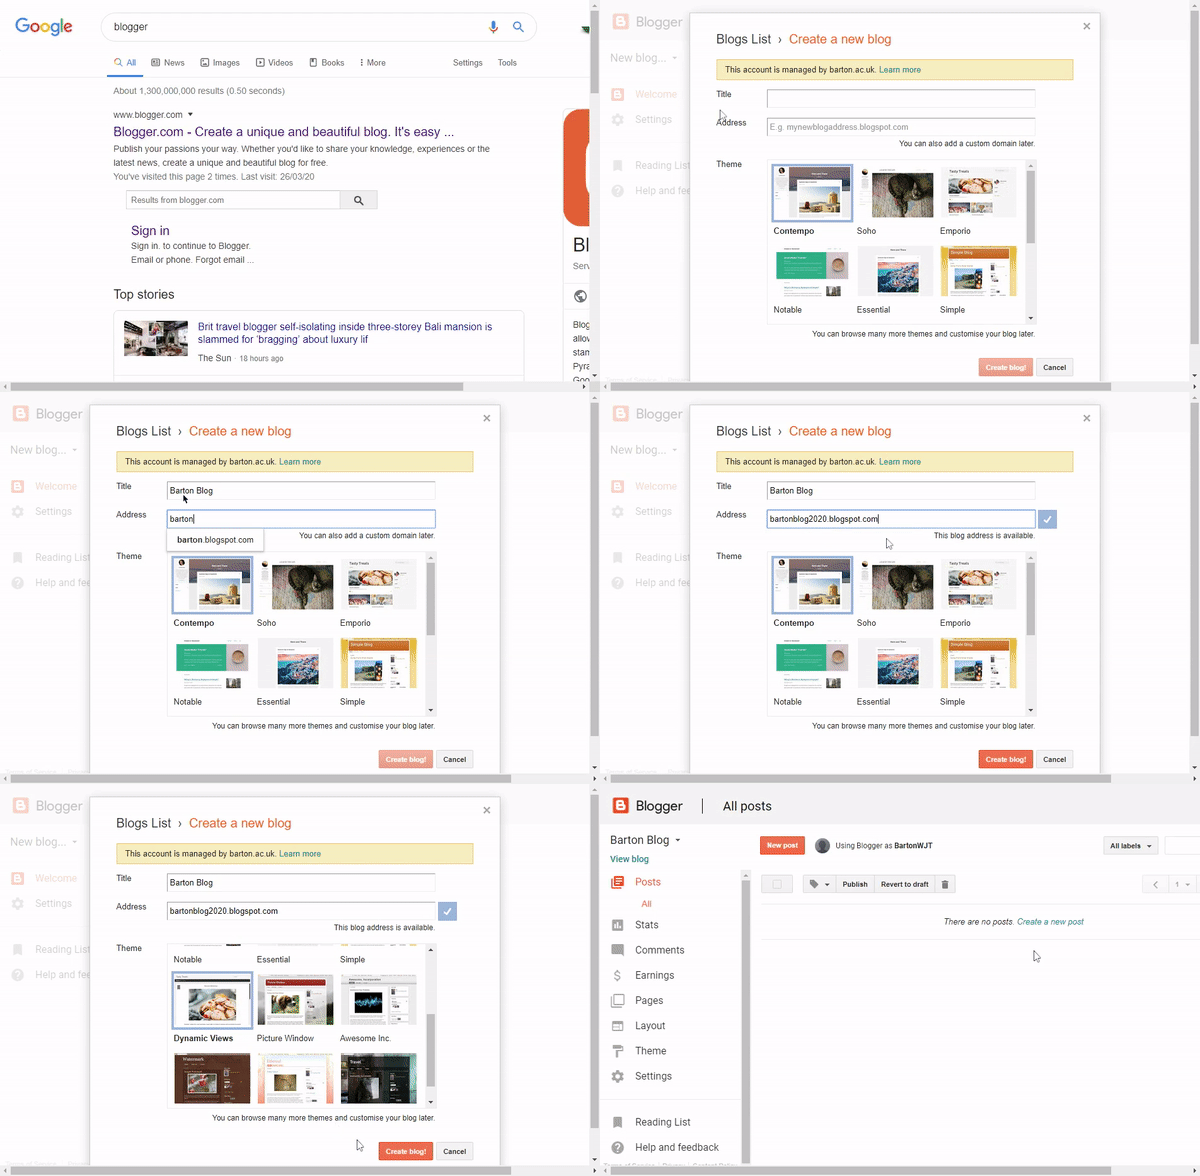
Creating your Blog
- Sign in using a Google account.
- On the left, click the Down arrow .
- Click New blog.
- Enter a name for your blog.
- Choose a blog address, or URL.
- This can be anything you want it to be, as long as no one has used that same URL before.
- Choose a template.
- Click Create blog.
That’s your blog created and ready for content!
Blog Theme
A plain blog might look a bit boring, there are a couple of ways you can change the design of your blog to make it look a bit better. Blogger provides a range of pre-made template themes for you to choose from. Follow the steps below to take a look:
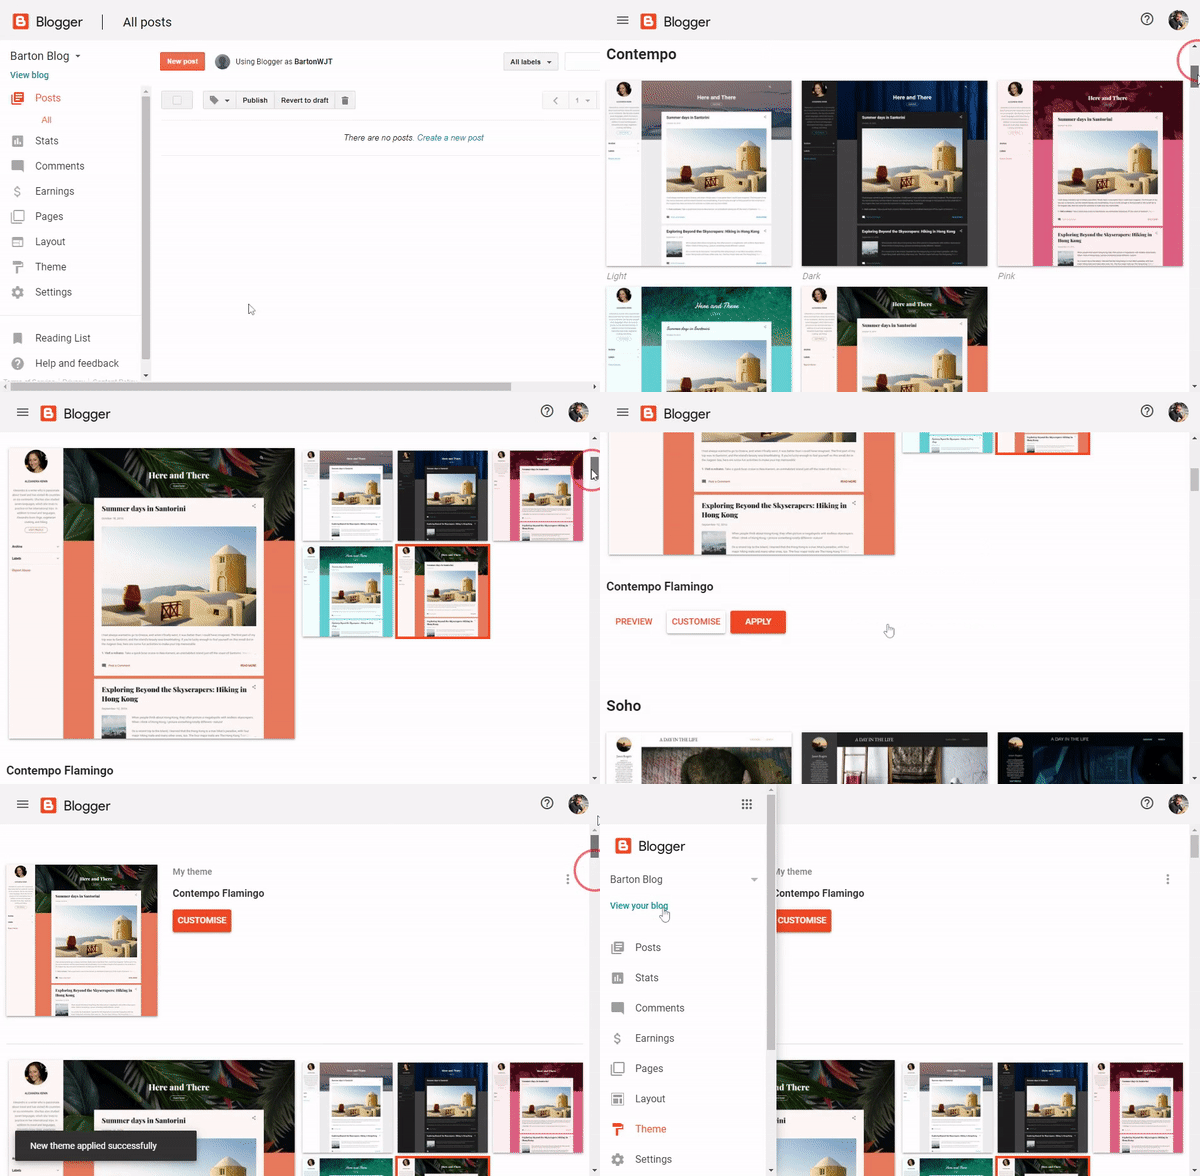
- In the left menu, click Theme.
- Click the theme you want to use.
- Just below the theme, click Apply to Blog.
Now you’ve picked the theme, you can customize it further by simply selecting the Customize option at the top of the page. From here you can change the background, colours, sizings and all sorts of settings. Once happy, click Apply to Blog in the top right corner, to make your changes live. Click Back to Blogger to go back to the homepage.
Layout & Gadgets
The layout of your blog might be something you want to change once you’ve got a bit more content on your blog, it can be hard to decide on a layout before you start adding content.
Gadgets are extra little bits to add to your blog, you can add lists, individual images, links to Wikipedia articles and more!
To start with both Layouts & Gadgets, just click the Layout menu on the left hand side.
In here you can move the different areas around and find a layout that works best for you. To add a gadget to a certain location click the Add Gadget button and then take a look through the list to find one you want.
Pages
You can add pages to keep information separate, such as an ‘About’ page or a ‘Contact’ page. There is no limit to the number of pages you can have on one blog. Before they will show on your Blog, you will need to add the Pages Gadget to allow users to navigate around the blog. Follow the steps below to add the Pages Gadget:
- In the left menu, click Layout.
- In the section you want your pages to show, click Add a Gadget.
- In the window, next to “Pages”, click Add .
- Set your settings and click Save.
- At the top right, click Save arrangement.
Adding, editing or removing a page
In the left menu, click Pages.
- Create a new page: Click New page. Enter a page title and other information and click Save, Preview, or Publish.
- Edit a page: Under the page you want to edit, click Edit. Update your page and click Save, Preview, or Publish.
- Delete a page: Under the page you want to remove, click Delete then Ok.
Link to external site
You can get a link on the Pages Gadget to link an external site, such as a YouTube channel or other website.
- In the left menu, click Layout.
- In the “Pages” section, click Edit .
- Under “Pages to show,” click + Add external link.
- Enter the page title and URL and click Save Link.
Select the pages to show
- In the left menu, click Layout.
- In the “Pages” section, click Edit .
- Select the pages you wish to show.
- Click Save.
- At the top right, click Save arrangement.
Posts & Content
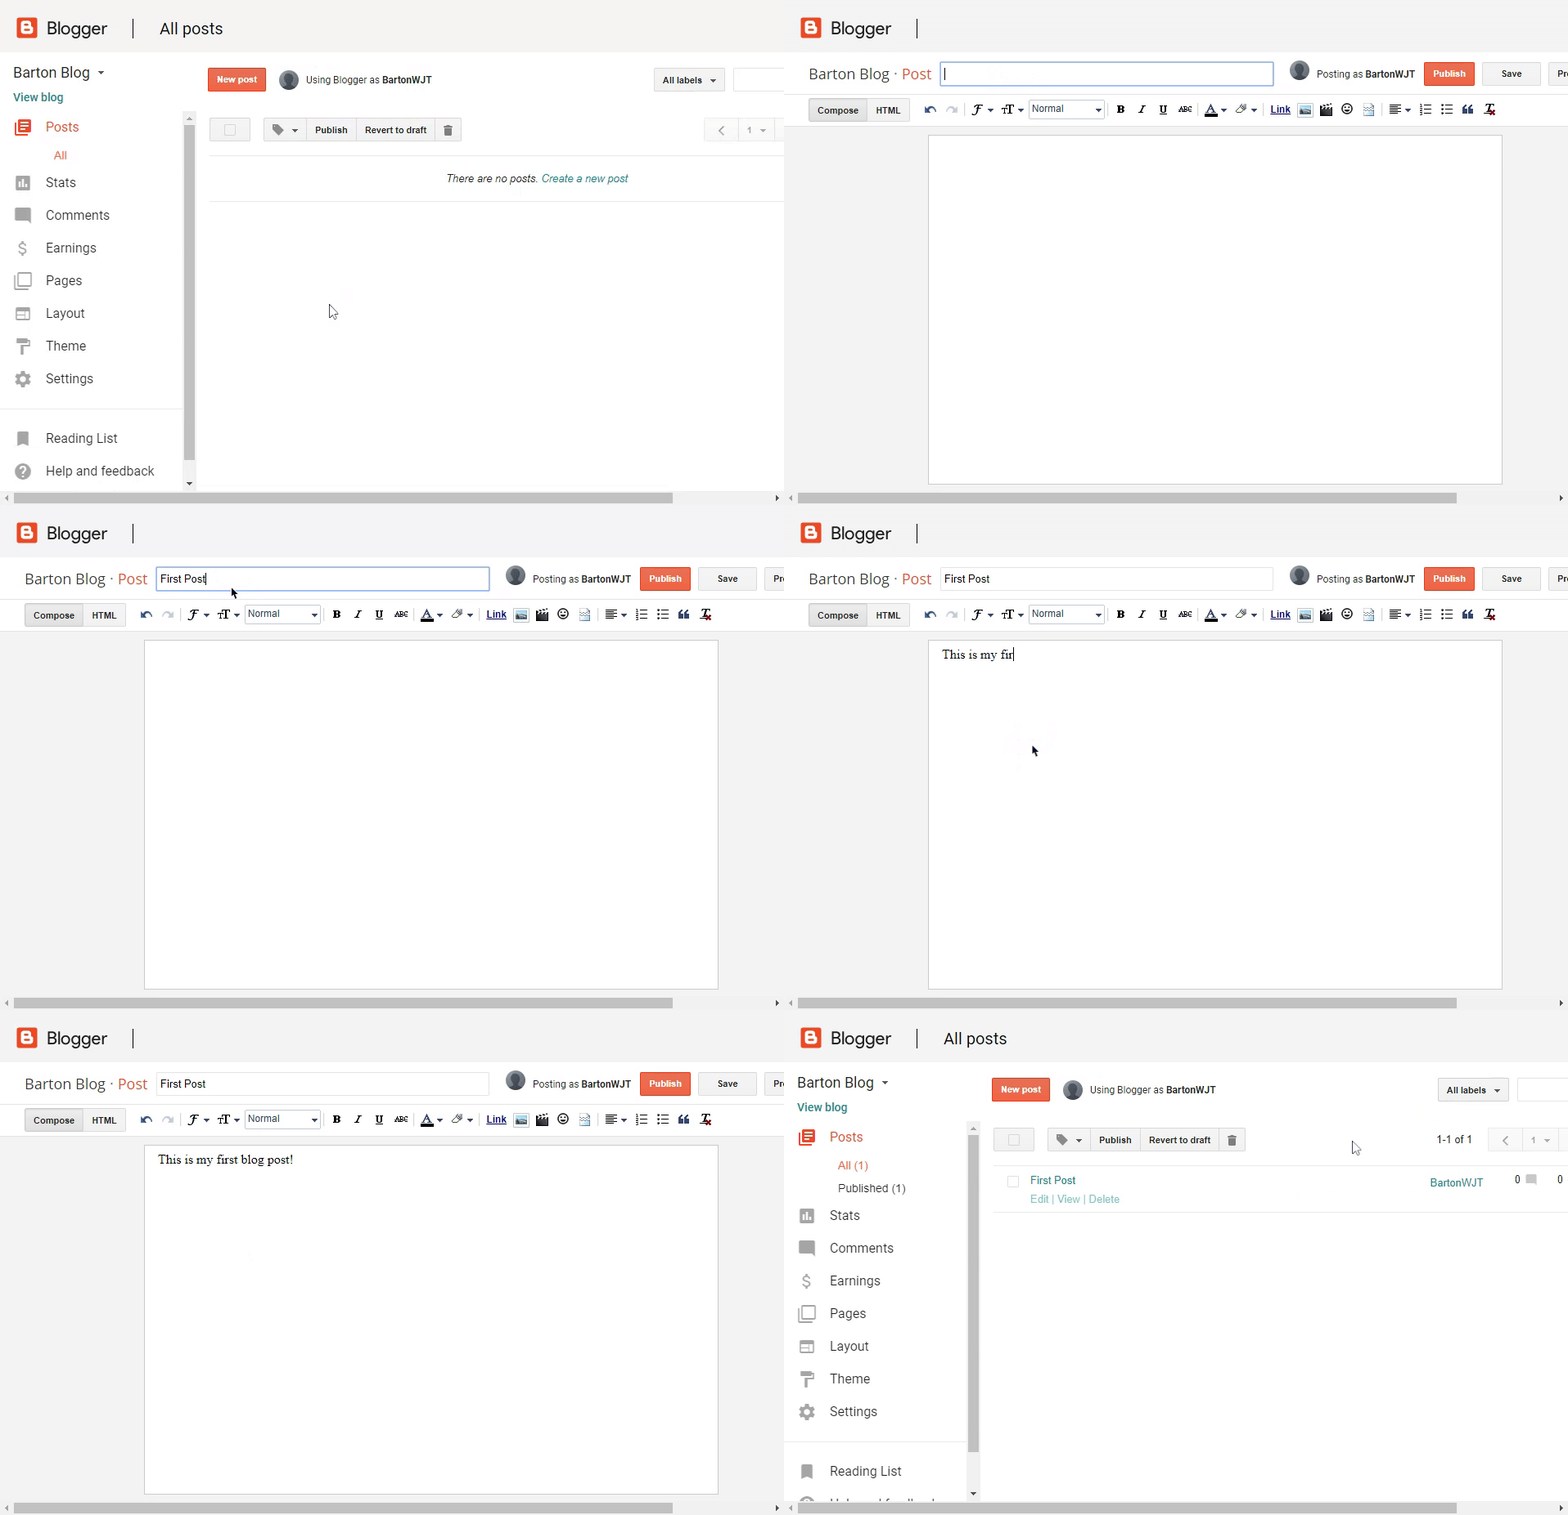
Write a new post
- Click New Post.
- Create the post.
- Optional: To see how your post will look, click Preview.
- To save your post without publishing it, click Save. To publish your post, click Publish.
Labels
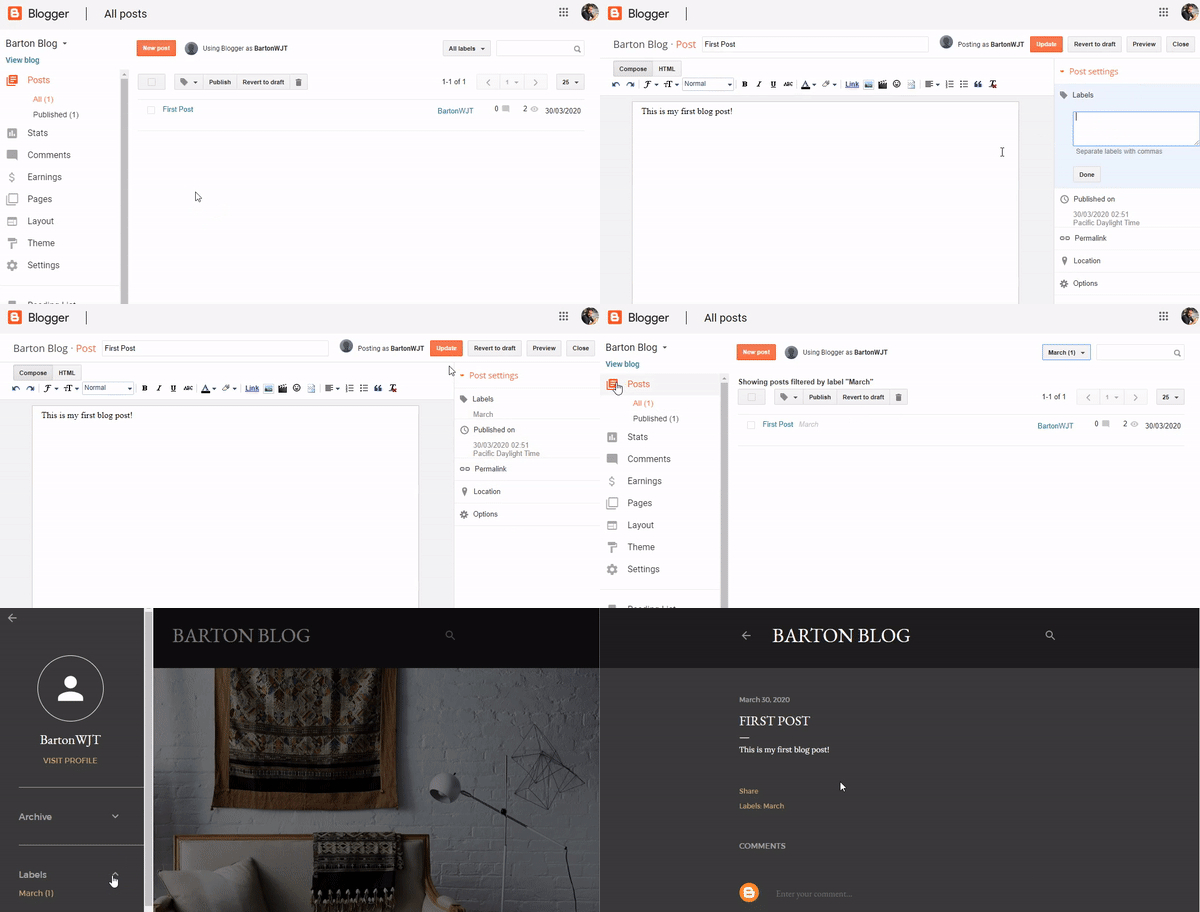
Labels can help you organize your posts to make it easier to find posts of a similar subject. You can create a label for anything, such as a month or year or just any word.
- You can add more than one label to a post.
- In your dashboard, you can find your labels next to the title.
- Your readers can find your labels in your posts and use them to filter your content.
Add labels to your posts (Optional)
- To open the editor view, click an existing post or click New post.
- On the right, click Labels.
- Enter a label or click an existing label.
Filter your posts by label
- In the upper right, click the label dropdown .
- Click a label.
Adding Images & Video to a post
Adding an image
- Create a new post or edit a post to add images.
- On the Post Editor, click Insert image .
- Choose where you’d like to upload the image from.
- Choose one or more images to upload.
- Click Add selected.
- When the image is in your post, click it to change the size, caption, or alignment on the page.
Stop images from opening in an overlay
By default, images on your blog will be opened in a large overlay, called a Lightbox. To prevent images from opening in the Lightbox:
- In the left menu, select Settings Posts, comments and sharing.
- Under “Posts,” find “Showcase images with Lightbox” and select No.
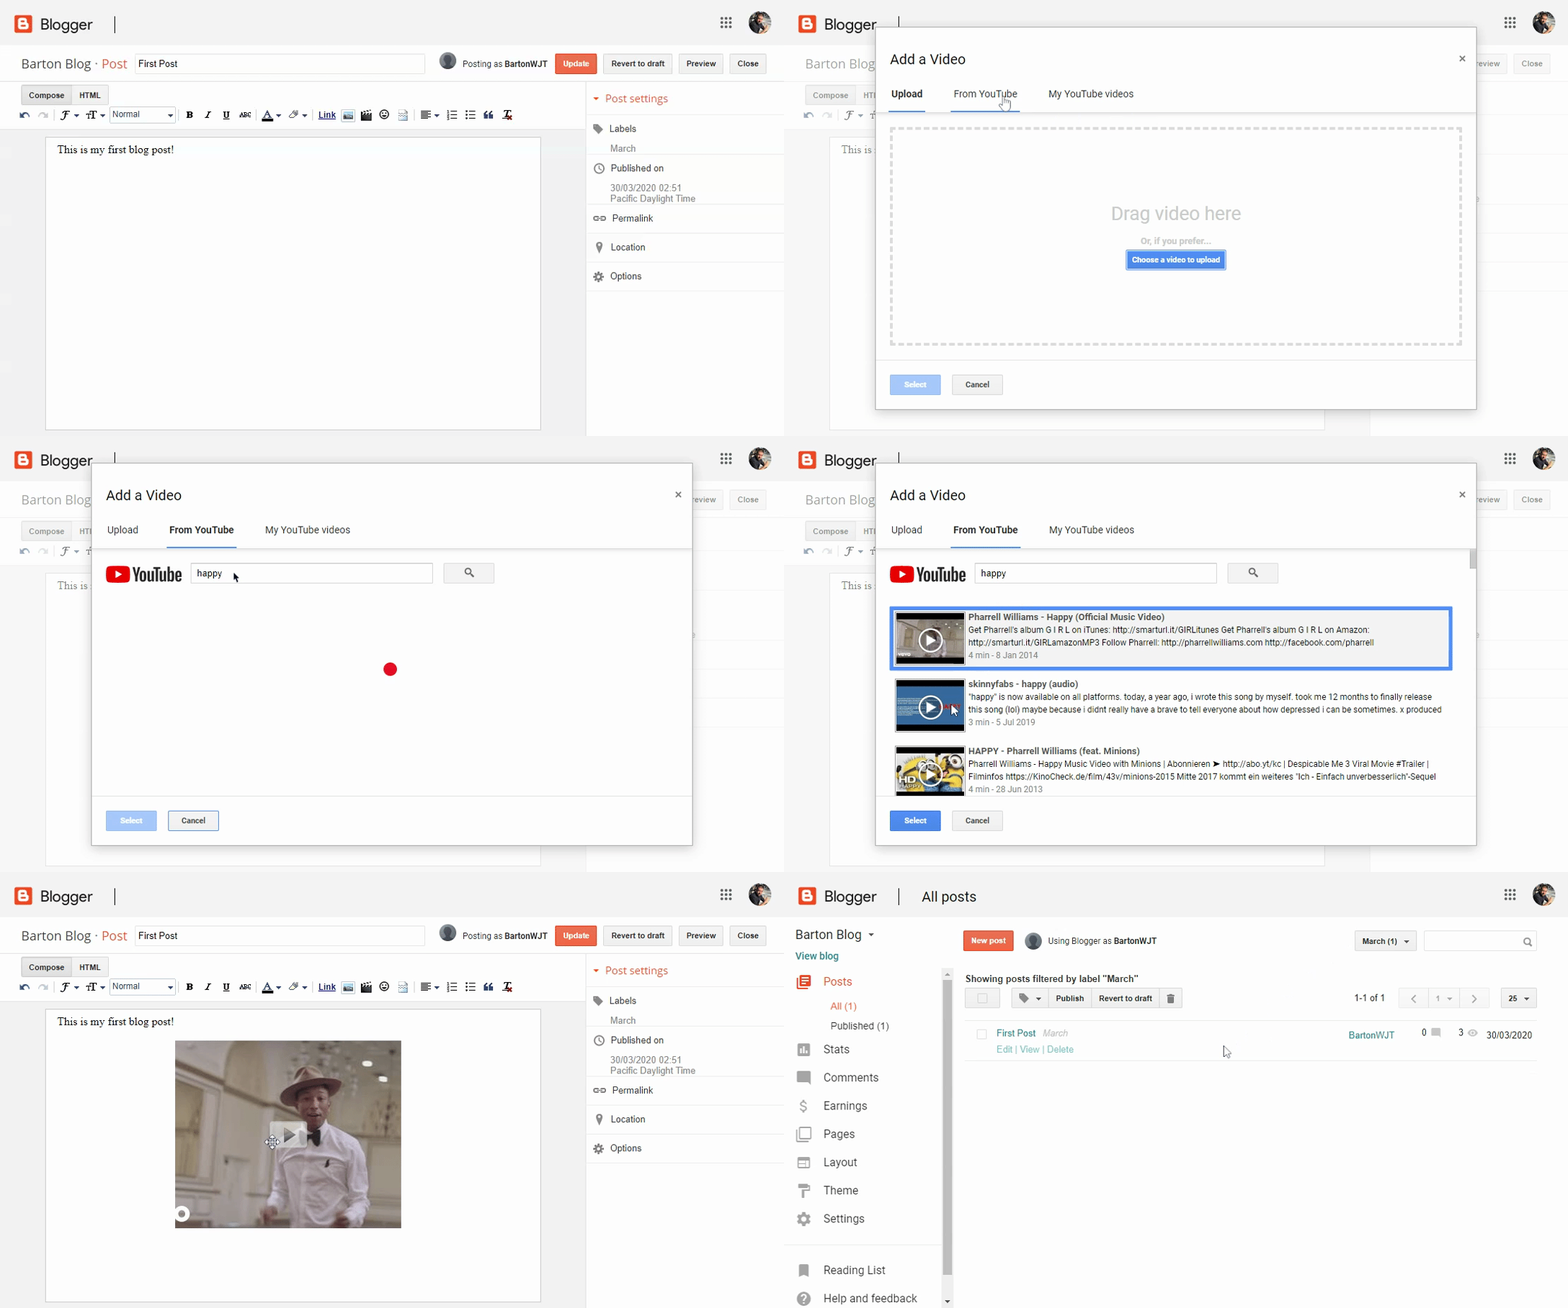
Adding a Video
- Create a new post or edit a post to add a video.
- On the Post Editor, click Insert a video .
- Choose the video you want to use.
- Click the From YouTube tab to search YouTube for a video or paste a YouTube link in.
Access to your blog
You can control who can edit your blog, and who can read it. It’s worth noting that your blog can either be Public for anyone in the world to see or Private where you can limit it to a maximum of 100 people to view it. If you want more than 100 people to be able to view it but don’t want it to be public to the world, it might be best creating a Google Site and adapting it into a blog instead.
Let others edit your blog
- In the left menu, click Settings Basic.
- Under “Permissions,” find “Blog Authors” and click Add authors.
- Enter the email address of the person you want to add.
- Click Invite authors.
Who can see your blog
- In the left menu, click Settings Basic.
- Under “Permissions,” find “Blog Readers” and click Edit.
- Select Public, Private – Only blog authors, or Private – Only these readers.
- Click Save changes.
After they accept the invitation, they’ll be listed as an author. You can add up to 100 total members (authors, administrators, or readers) to your blog.






Leave a Reply
Want to join the discussion?Feel free to contribute!